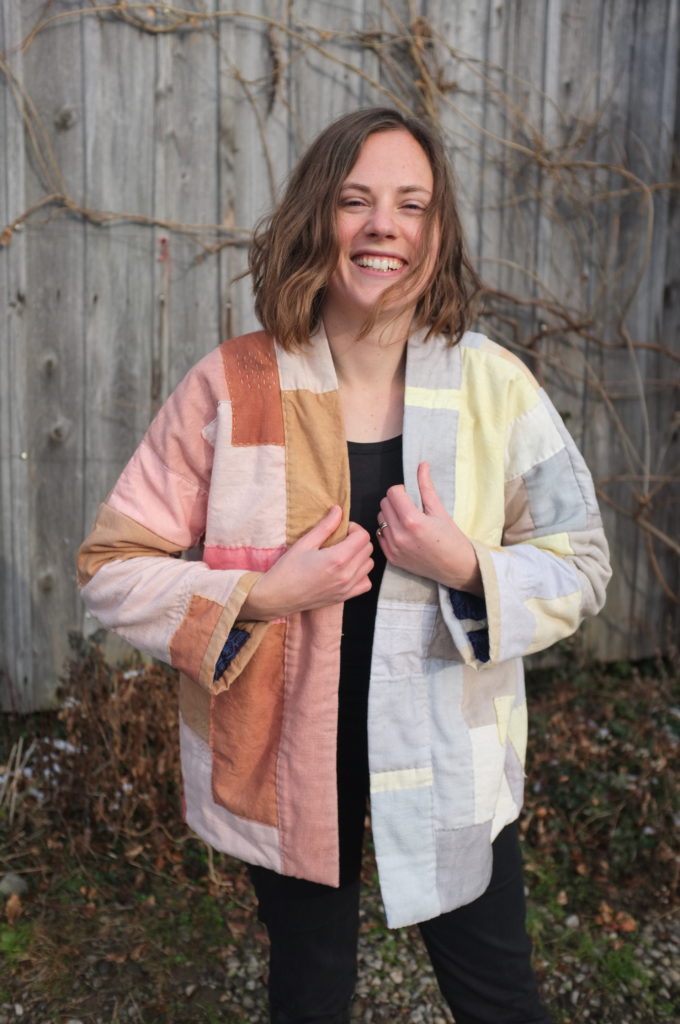
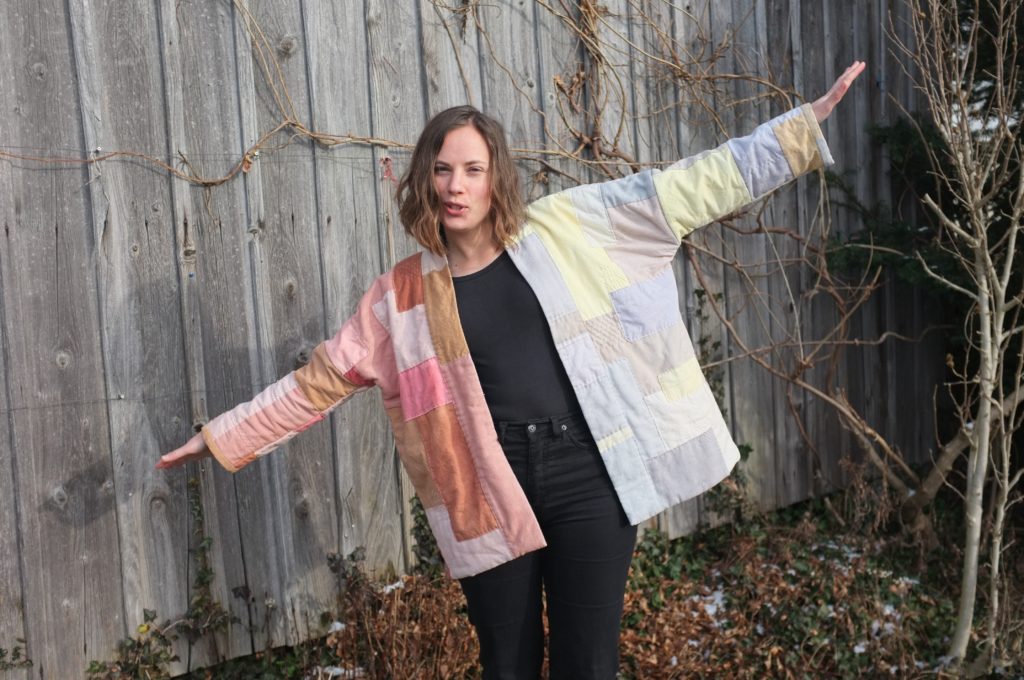
This autumn the #sewfrosting challenge was taking the sewing community by storm. Initiated by Heather Lou from Closet Case Patterns and Kelli from True Bias, the premise of the challenge was to sew something that wasn’t “cake” (a wardrobe basic) but to sew “frosting” (something frivolous, fun). I loved the idea and immediately started scheming when the challenge was announced. Very quickly I decided I wanted to make a quilted coat. I’ve been loving Natalie Ebaugh’s and Hannah Miley’s quilted coats. And when I saw this stunning quilt from Salt + Still it was clear that I wanted it to be a quilted coat using naturally dyed fabric.

As the base pattern for the jacket I decided to use the Wiksten Haori, a pattern that I’ve been meaning to make for ages. Due to it’s simplicity and oversized nature it was perfect for the quilting that I was planning. If you are wondering what an Haori is, I recommend reading Jenny’s blog post on why the name of the Wiksten Kimono was changed to Wiksten Haori.
The ones that follow me on Instagram know that in November I spent a few days doing a lot of natural dyeing. I started with a cotton table cloth and a cotton/linen curtain; both old and stained / with some holes, which luckily wasn’t a problem for the project I was planning with it. Then I dyed pieces of the fabric in all the colours that I could find.

I don’t have a lot of experience with natural dyeing, apart from some indigo and avocado dyeing (like my Blaire Shirt), but I was keen to experiment a little. The whole dyeing process was very intuitive. I basically just used what I could find in my parents house and garden. Once a year they have a little natural dyeing festival, so they actually have some dye plants in the garden. I even was able to save some Madder root, that my mother was getting rid of, since it is growing like weeds. If you want more details on the whole process, I have saved everything in my story highlights section on Instagram.
I won’t go through the whole process, but basically I used soy milk on all the fabric as a mordant and prepared the dye bath in either cold or hot water. I played around with the temperature to figure out what worked best for each colour. Except for some iron liquor (home made) on eucalyptus (from our France holiday) I didn’t use any agents to change the colour. I also didn’t use any fixatives, since I found with my avocado dyed clothes that the colour keeps surprisingly well. We’ll see how well the other colours hold up.


The whole dyeing process was super fun and I loved creating a whole rainbow of colours. I’m by no means an expert in natural dyeing but I learned a few things along the way:
- Make sure to spin out the soy milk/water mixture in the washing machine and don’t wring it out by hand, otherwise you’ll end up with uneven dye patterns.
- Be patient. Some colours take more time to extract than others. Avocado skins and pits for example take a while to release the colour.
- Start with low temperatures. Some colours (e.g. from the sunflower seeds) change colour when they come to a boil. In most cases the colours turn into a grey/brown, which you might want to avoid.
- Start with little fabric swatches to get a feel for how potent the dye is. Once you know the dye is potent enough start adding bigger pieces. This obviously works best when you are doing a quilt rather than trying to dye lengths of fabric for a garment.
- Accept that the colours might change with exposure to sun and that the colours will fade quicker than chemically dyed fabric. My avocado dyed shirt has shifted into a slightly warmer colour over time. I love the fact that the colours change, in exchange the natural colours have a lot more depth than anything chemically dyed.
- Natural dye keeps very well if stored in a plastic container. I had some left-over avocado dye that I made in September, and two month later it still worked perfectly. Just make sure to strain it properly before storing, to ensure that no plant pieces are left in the liquid that could start molding.
- Experiment! I was in such a dyeing frenzy that I just tried random stuff that I could find. For example with the bay leaves, I didn’t know that you could dye with them, and even less that they would give a beautiful pink, such a lovely surprise!
There is definitely a lot more that I can learn about natural dyeing and I can’t attest to the longevity of the colours yet, since I have only hand washed them in water so far. For this project though I’m not that concerned, since I won’t be washing it a lot. For anyone interested in getting into natural dyeing, I can highly recommend the book “The Modern Natural Dyer” by Kristine Vejar , Rebecca Desnos’ blog and the Skillshare Course “Natural Dyeing: Transform Cloth Using Food Dyes” with The Dogwood Dyer.

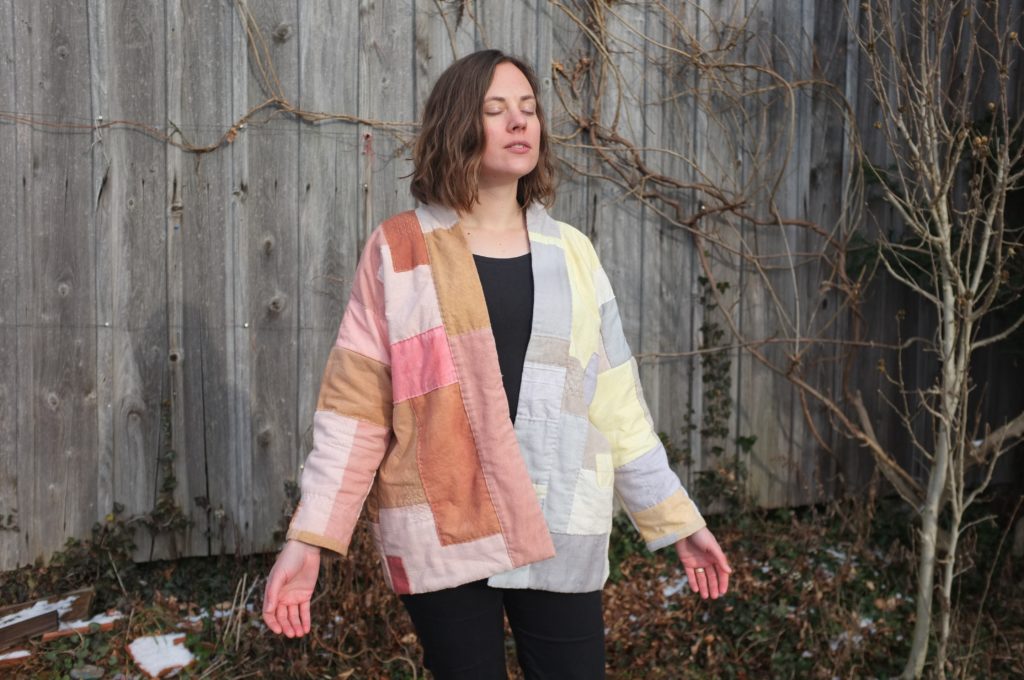
Once I had my stack of fabrics, I had to decide on how I would want to use them on the jacket. Originally I had planned to stick to a limited colour palette but then I got carried away in the dyeing process. Once I was done, I had grown attached to each colour and was unable to narrow it down. I was afraid I would end up with a crazy jacket if I used all of them, so I consulted Instagram. In the end most people supported the colourful jacket idea and I decided to go for it, it was for #sewfrosting after all!

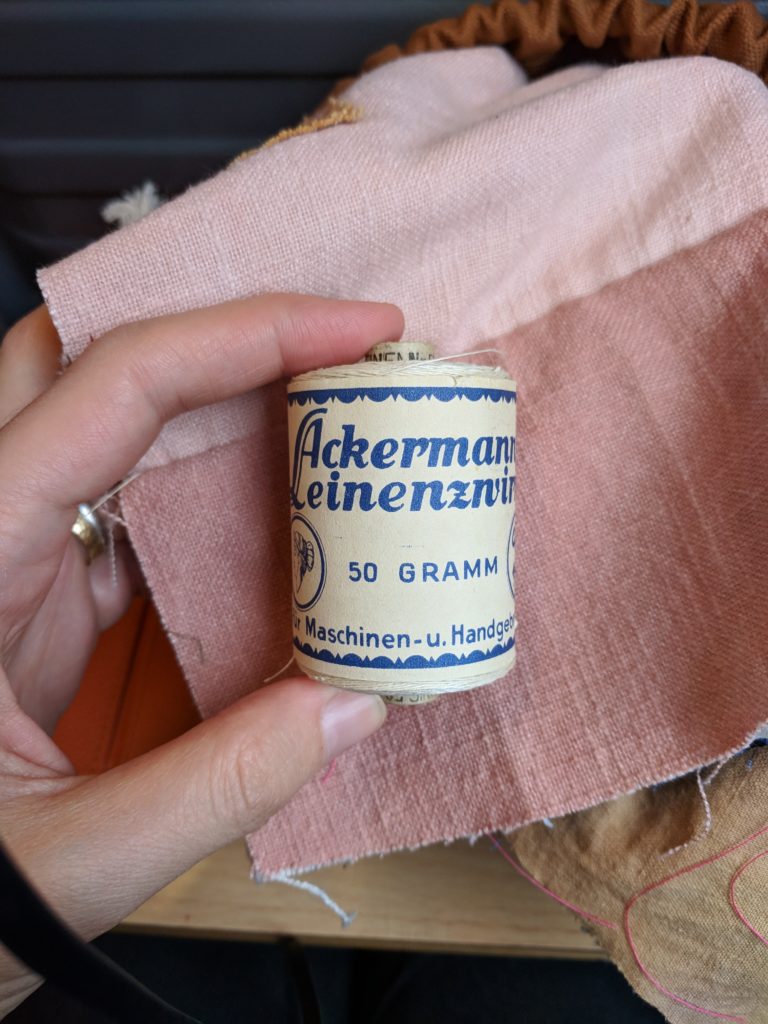
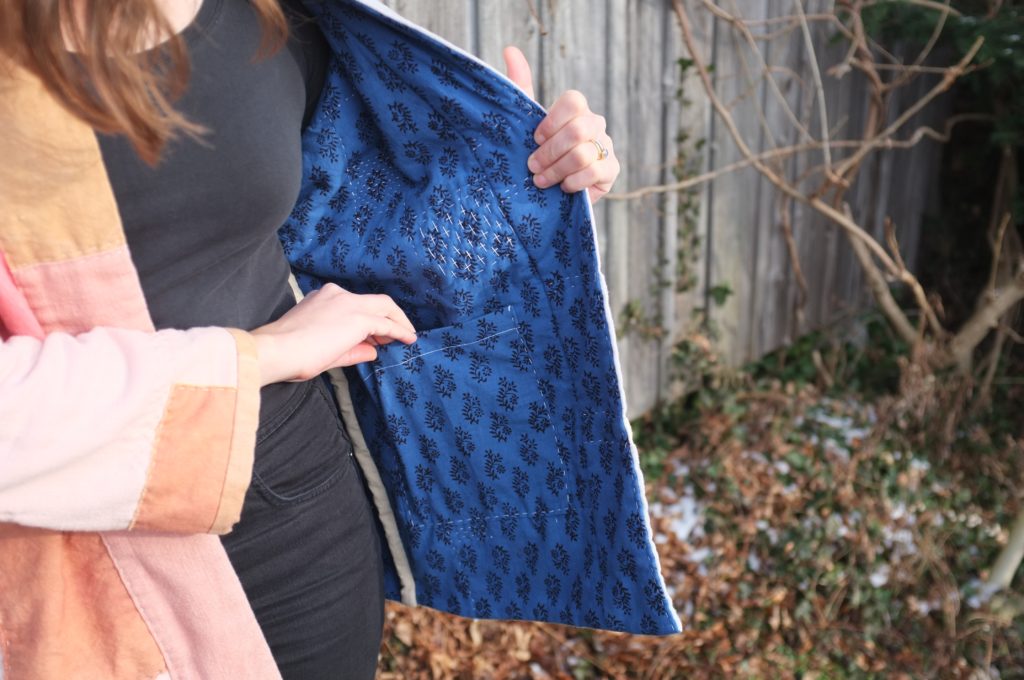
Once I had roughly decided on a design (one front in cool colours, the other in warm and the back with a colour gradient) I started piecing the quilt. To make it all manageable to quilt and to avoid wasting precious fabric I decided to assemble and quilt each jacket piece individually. For that I cut the pieces in a lining fabric (a beautiful block printed cotton that my husband brought back from India a few years back) and the cotton batting. Then I arranged the dyed fabric pieces on top to roughly work out the design. For the piecing I worked with a mixture of machine quilting (for the larger pieces) and hand stitching (for the smaller accent pieces). Already in the dyeing process I had cut all the swatches on grain, so that I decided to fringe some of the smaller pieces and applique them on top. Finally I hand-quilted everything using a vintage linen thread that I had picked up at a flea market this summer.
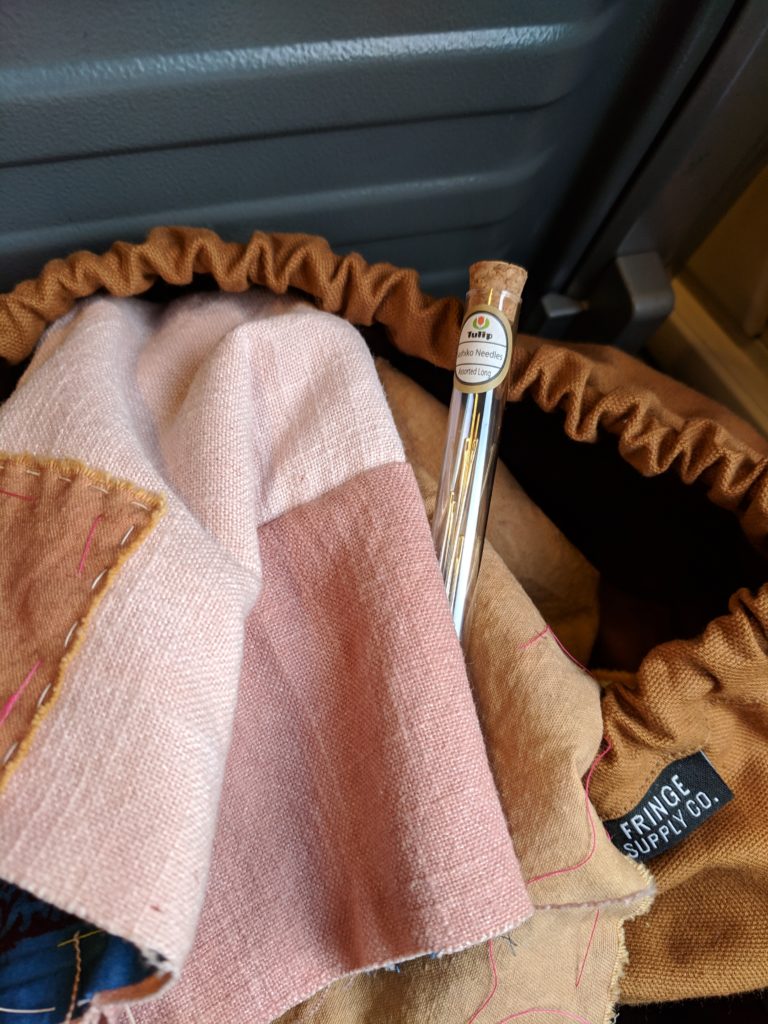
I really enjoyed the whole quilting process; especially because I was working on it while the jacket was in pieces ,which meant that it was the perfect project to work on while travelling or in front of the television. In terms of quilting pattern, I decided to follow all the joining seam lines and add additional Boro stitching in different places. The linen fabric had a few little holes, so I focused first on adding reinforcing stitches there. The rest of the quilting didn’t follow a strict pattern, my only aim was to create a balanced design overall.
Once the individual pieces were quilted I assembled the Haori. First the fronts, back and the sleeves. The collar I slimmed down to remove the fold-over detail, which would have been too bulky in the quilted fabric. To finish the seams and the sleeve hems I cut strips of left over fabric and bound them by hand. For the bottom hem I decided to just fold both the outer and the inner fabric to the inside and close the seam with a blind stitch. You may notice, that I left off the big patch pockets of the original pattern. I thought they would have made the pattern too busy with all the quilting going on. Instead I decided to add one pocket to the inside.
The pattern is super straight-forward to assemble, though I had to change the order of construction quite a few times. I chose to make a size M (which corresponds to my hip measurements) and I’m happy I did. While it is designed as quite an oversized jacket, I need the room to be able to move around in this thick fabric.
Phew, what a long post! For everyone making it that far, congrats!
This project definitely was a labour of love, and I’m not sure if I would have ever tackled such a big and crazy project if it wasn’t for #sewfrosting. So thanks Heather Lou and Kelli for initiating such a fun challenge! During the process it often felt more like working on a piece of art rather than sewing a garment, since it was so intuitive and the outcome so unpredictable. And I have to say, it was such a satisfying experience! I also decided to take it really slow and hand sew the majority of it. That meant my fingers had blisters at the end and I missed the deadline of the challenge by a month. But it was so worth it!
The first outing for this Wiksten Haori was my uncle’s birthday last weekend. He is an artist, so it was the perfect setting and such a great conversation starter too!
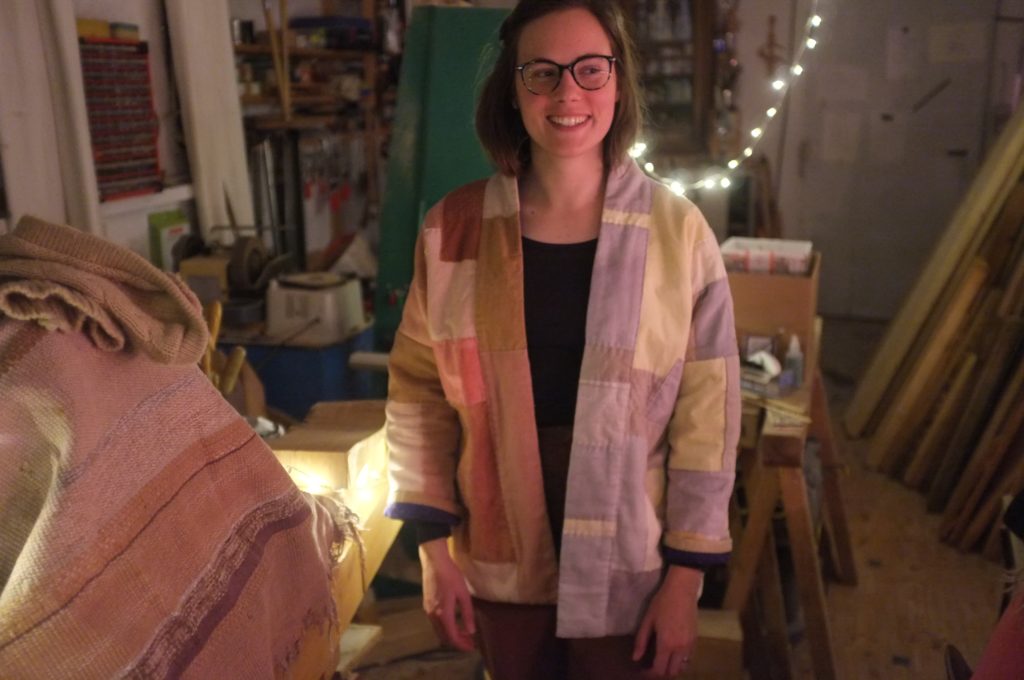
The one thing that I have taken away from this project is that I love working on projects where the fabrics and colours guide me and I don’t have to strictly follow instructions. I’ve never really identified as an artist (more as a crafter/maker) but this project really felt like art and I had so much fun! And yes, I do feel a little bit like a crazy lady in this jacket; and I don’t think I will wear it out a ton. But I love it nonetheless!


So here is to the new year, to taking risks, to making art and creating something crazy once in a while. Happy 2019 everyone!

Edina,
your jacket is a work of art! I have never seen anything a beautiful and intricate -ever. The fact that you dyed all the fabrics yourself and painstakingly sewed everything by Hand (!!!!) makes it even more Special. BRAVO!!!!
Thank you for writing about the dying process, I’ve been wanting to do that for years, your post might finally get my act together.
xB
Thanks so much Bianca! This was a real passion project, I can highly recommend slowing down and doing more hand sewing; it gives you a deeper connection with the garment. And you should definitely try out natural dyeing! I’ll have to warn you though, it is addictive!
Wow, this is just fantastic!!! So inspiring and I am the same: I’ve been wanting to start dyeing for years and this is perfect inspiration.
Thanks Heather! You should definitely give natural dyeing a go, it’s fun and easy to try out.
This is amazing! I’m a complete novice in both sewing and quilting, but I’m similarly inspired by Natalie Ebaugh’s quilted jackets. So much opportunity for color, design, and experimentation in what is a relatively simple pattern. After doing some digging, it looks like the Wiksten is the pattern to riff off of when it comes to the look I want. I doubt I’ll take on anything as delightfully challenging as you did, but your post is incredibly inspiring and helpful for someone looking to make something similar. (Perhaps I’ll stick with contrasting sleeves and pockets!) I also appreciate the ‘slow and steady’ approach you took with this. I do most of my crafting by hand—embroidery, knitting, needle-felting—and so my process is always a bit slow, especially when wedged into a student’s schedule. If I take this on, it would definitely be a hand-quilted, hand-sewn effort. Thank you! Lovely jacket!
Thanks Olivia for your thoughtful comment. I’m glad this post inspired you. The Wiksten jacket is definitely a great starting point for a quilting project thanks to its simple lines. If you are already familiar with other hand crafts then quilting a jacket shouldn’t be too difficult, it just needs a little bit of patience. It’s a perfect project to take on a long train ride. I really hope you will give it a go. I can’t wait for the weather to cool down a bit so that I can wear it again.