For our Japan trip I wanted a light backpack that could be folded up easily when not in use, so when I saw that Sarah Kirsten was working on the Raspberry Rucksack I knew it would be a great fit. Luckily the pattern was released just in time and I finished my Raspberry last week.
I’ve sewn all sorts of things over the last few years but somehow I’ve never made a backpack before. My main issue is sourcing all the notions without any good shops nearby. I was really intrigued by this design though and decided to bite the bullet and order online. The trickiest bit was to find an o-zipper (with the two pulls in the middle) but I found some metal zips at Schneidereibedarf Werner. They offer zips in 1 cm increments, which was super handy in this case. The zip though is a little bit heavy and a clear white, whereas I would have preferred a cream colour. However, since the zipper isn’t that visible when the backpack is closed it’s not such an issue.
I also got the rectangle rings and slide adjusters from the same shop. The webbing that I had ordered there too, turned out to be too flimsy so I had to get a different option from Amazon. Since I could only order 12 meters I decided to order a plain white figuring that since it was cotton I could dye it in the right colour for each project. When it arrived it was clear that the contrast of the white against the dark brown fabric was too stark so I quickly tea dyed it to get more of an off white. Two bags of Earl Grey made a strong enough brew to dye all the webbing. I love an easy natural dyeing solution!
Speaking of fabric, I knew from the beginning that I wanted to use the leftovers from my Persephone pants to make the backpack (#sewingleftovers). The fabric is sturdy but still relatively thin and I just love the brown colour. To make it more weather resistant I decided to wax it myself using a Merchant & Mills re-proofing bar from Juni Design. Applying it was really easy, you just have to rub it on and then iron between two sheets of baking paper. Just be aware that an untreated fabric like this will soak up a lot of wax. I used up a little bit over one bar to wax all pieces. Still it’s an easy and affordable way to create your own oilskin fabric.
The Raspberry Rucksack comes in two sizes, Little and Big. I went for the Big version and think the size is just right.


As this was my first backpack ever, I was glad that the instructions were so thorough. It’s clear that Sarah has put a lot of effort into figuring out the best construction and the diagrams are super clear. Nevertheless, this is not an easy project. It really requires you to pay close attention to the instructions and be very accurate. Also in some places, especially the corners, your machine might struggle to get through all the layers. My machine is quite powerful but still I had some issues, especially when it came to attaching the pop-up pocket. Luckily my topstitching thread was a perfect match so any wonky seams are not really visible. My main recommendation for the trickier topstitching parts is to use a glue stick to attach the pieces first. That gives you much more control and nothing moves around.
Despite these struggles, it was a really enjoyable sew. I like when I have to be super focused and can learn some new techniques. The construction of the fully lined pop-up pocket, for example, was really mind boggling but really fun (make sure to check out the sew along on Sarah’s blog if you are having issues).
The one change I made to the pattern was to add a pocket on the side for a small water bottle. I always have water with me when I travel and prefer to have easy access to it. To do that I just cut a piece of fabric with the width of the middle panel, lined it and topstitched it on.
Construction-wise I followed the instructions in most parts. One thing I had to change was the order of attaching the back panel. The instructions tell you to first attach the top and the bottom and afterwards the sides. However, if you are like me and are not the most exact sewer, then your side seams might not match. I had to unpick the top seam and shorten the back piece a little bit to make it all work.
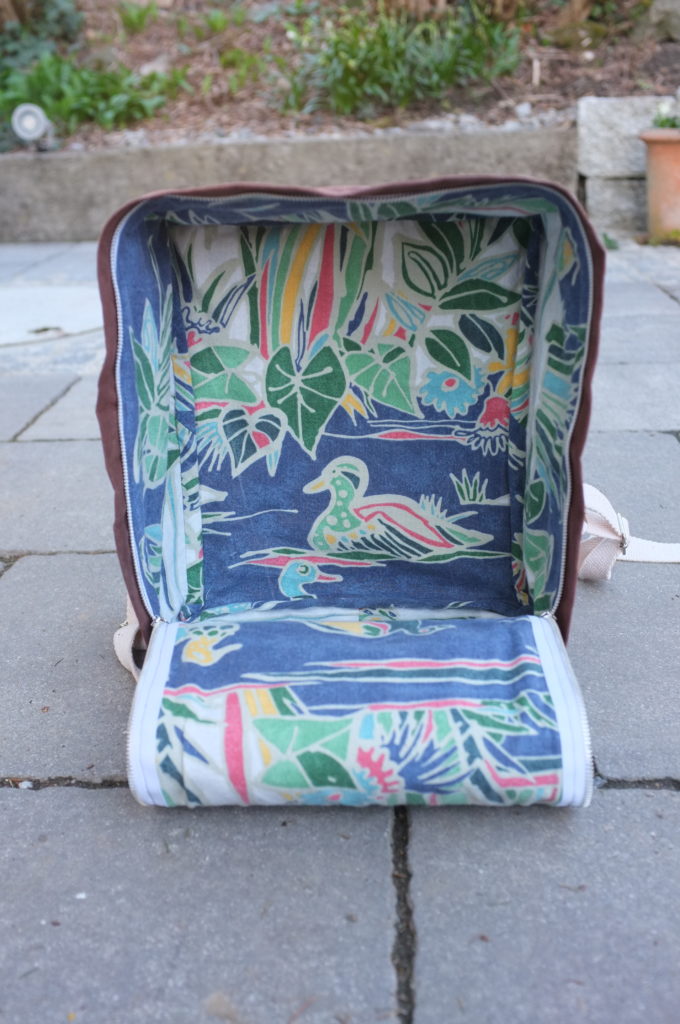
As for the inside of the backpack, I decided to line it with this fun duck print from the flea market (which somehow reminds me of my childhood in the 90s). Again the finish is super clean as the inside seams are bound with bias tape. I decided to make my own bias tape in the lining fabric. While it’s always a bit of a pain to make, it’s so worth it. To not disturb the clean finish on the inside I even decided to stitch the bias tape down by hand (I love a bit of hand sewing).


As you might be able to tell from the pictures, this little backpack makes me very happy. It’s a perfect size and still very light-weight. Obviously it’s not super ergonomic but I’ve used it a couple of times now and it’s surprisingly comfortable to carry. I love that the front flap opens all the way so it’s really easy to pack. In a next version (I’m sure there will be one) I’ll further round the top corners at the zip as it’s quite difficult to open the zip without folding back the zipper flap. I read beforehand that others had the same issues so I already rounded them more than I would have based on the instructions, still the curve is a little bit too tight. Next time I would also try a plastic zipper that opens more easily.
Despite these struggles, this backpack turned out great. It’s cute and should be perfect for our trip. I’ll report back once I’ve lugged it around Japan for a month.
If you are interested in making a backpack, I’d definitely recommend this pattern. Be prepared to unpick a few times and make your machine work hard (which I guess is true for any backpack pattern). But Sarah really has you covered every step of the way and the result is clearly worth it. I’m glad I gave backpack making a go, it’s such a useful skill!